The Ultimate Guide to Candle Making Business for Profit in 2026
Candle Making for Profit: Start Your Thriving Business Today
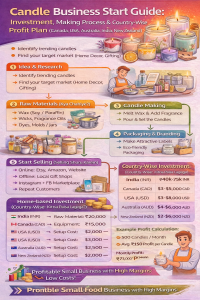
Candle Making business ek low-investment aur high-margin creative business hai jo aajkal bahut trend mein hai. Decorative candles, scented candles, soy candles aur festival candles ki demand globally increase ho rahi hai. Home décor, gifting, weddings aur aromatherapy market mein candles ka use bahut popular hai.
Countries jaise:
Canada
United States
Australia
India
New Zealand
इन sab countries mein handmade aur organic candles ki strong demand hai.
Why Candle Business is Profitable?
✔ Low raw material cost ✔ High retail selling price ✔ Home-based start possible ✔ Online selling option (Amazon, Etsy) ✔ Gifting market huge hai
Ek candle ki cost kam hoti hai lekin selling price high hoti hai — yahi is business ka main profit point hai।
Double boiler mein wax ko 70–80°C tak melt karein.
Step 2: Fragrance Add Karein
Melt hone ke baad 5–10% fragrance oil add karein.
Step 3: Color Add Karein
Liquid ya block dye add karein.
Step 4: Wick Set Karein
Mold ya jar ke center mein wick fix karein.
Step 5: Wax Pour Karein
Melted wax carefully mold mein daalein.
Step 6: Cool Hone Dein
4–6 ghante mein candle set ho jayegi.
Simple process hai aur ghar par easily start ho sakta hai।
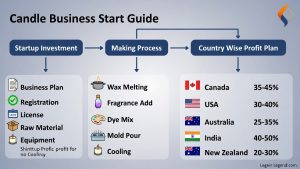
Investment (Kitna Paisa Lagega?)
India (INR)
Raw material: ₹20,000
Equipment: ₹15,000
Packaging: ₹10,000
Total: ₹40,000 – ₹75,000
Canada (CAD)
Setup: $2,000 – $6,000
USA (USD)
Setup: $3,000 – $8,000
Australia (AUD)
Setup: $2,500 – $7,000
New Zealand (NZD)
Setup: $2,000 – $6,000
Home-based business hone ke karan rent cost bach sakti hai।
Country-Wise Cost & Profit Per Candle
India
Making Cost: ₹40 – ₹80
Selling Price: ₹150 – ₹400
Profit per Candle: ₹100 – ₹250
Canada
Making Cost: $3 – $5 CAD
Selling Price: $12 – $25 CAD
Profit: $8 – $20 CAD
USA
Making Cost: $4 – $6 USD
Selling Price: $15 – $30 USD
Profit: $10 – $24 USD
Australia
Making Cost: $4 – $6 AUD
Selling Price: $15 – $28 AUD
Profit: $10 – $22 AUD
New Zealand
Making Cost: $3 – $5 NZD
Selling Price: $14 – $26 NZD
Profit: $9 – $21 NZD
Premium scented soy candles mein profit margin 60–70% tak ho sakta hai।
Monthly Profit Example (India)
Agar aap:
500 candles per month sell karein
Average profit ₹150 per candle
Total Profit = 500 × 150 = ₹75,000 per month
Festival season mein profit double bhi ho sakta hai।
Licenses & Legal Requirements
India:
GST Registration (if turnover high)
MSME Registration
Canada, USA:
Small Business Registration
Product labeling compliance
Australia & New Zealand:
Consumer safety labeling rules
Scented candles mein ingredient labeling important hota hai।
Marketing Strategy
✔ Instagram Reels ✔ Facebook Marketplace ✔ Etsy Store ✔ Amazon Handmade ✔ Local gift shops tie-up ✔ Wedding & event planners collaboration
Branding aur attractive packaging success ka main factor hai।
How to Increase Profit?
Bulk raw material kharidein
Premium fragrance use karein
Gift combos banayein
Subscription gift box start karein
Corporate gifting market target karein
Online selling se international orders bhi mil sakte hain।
Challenges in Candle Business
Wax price fluctuation
Season-based demand
Competition
Fragrance quality issue
Solution: Unique design + strong branding.
Is Candle Business Profitable?
Yes, bilkul profitable hai agar:
Product quality high ho
Attractive packaging ho
Online marketing strong ho
Cost control maintain ho
Low investment aur high margin hone ke karan beginners ke liye best business option hai।
Simple Flowchart (Text Version)
Idea → Market Research → Raw Material Purchase → Candle Making → Packaging → Branding → Online/Offline Selling → Orders → Scale Business
Final Conclusion
Candle business ek creative aur scalable small business model hai jo India, Canada, USA, Australia aur New Zealand sab jagah profitable ho sakta hai। Agar aap ₹40,000 ya $3,000 jaisa small investment kar sakte hain, to aap ek strong handmade candle brand bana sakte hain। Premium scented aur decorative candles mein highest profit margin milta hai Consistency, branding aur online marketing se aap is business ko part-time se full-time profitable venture bana sakte hain। Agar aap chahte hain to main iska professional flowchart image bhi create kar sakta hoon website use ke liye।
Scented Candles DIY Candle Business Online Organic Candles Sale Decorative Candles Wholesale Aromatherapy Candles Profit Candle Making Kits Luxury Candle Brands Homemade Candle Ideas Candle Making Supplies Online Candle Making business start Candle Making business in hindi Candle business in hindi
Tiffin Service: The Ultimate Guide to Starting Your Home-Based Food Business
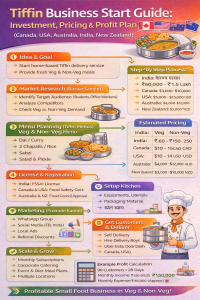
Tiffin service business आज के time में one of the most profitable small food businesses है। Students, working professionals, elderly लोग और bachelors healthy ghar ka khana prefer करते हैं। Agar aap cooking जानते हैं और small investment से business start करना चाहते हैं, तो tiffin service ek strong opportunity है।
What is Tiffin Business? (Tiffin Service Kya Hai?)
Tiffin service ek home-based food delivery business है जहाँ daily fresh home-cooked meals customers को subscription basis पर deliver किए जाते हैं।
Aap vegetarian (Veg) aur non-vegetarian (Non-Veg) dono options provide कर सकते हैं।
Why Tiffin Business is Profitable?
✔ Low investment ✔ High demand in metro cities ✔ Regular monthly income model ✔ Repeat customers ✔ Home-based start possible
Countries जैसे:
Canada
United States
Australia
India
New Zealand
इन सभी जगहों पर Indian tiffin और homemade food की strong demand है।
Step-by-Step Guide: How to Start Tiffin Business
Step 1: Market Research (Bazaar Samjho)
Target audience identify करें
Students, IT employees, office staff
Nearby competition check करें
Veg vs Non-Veg demand analyze करें
Step 2: Menu Planning (Menu Decide Karein)
Vegetarian Menu Example:
Dal
2 Roti / Rice
Sabzi
Salad
Pickle
Non-Vegetarian Menu Example:
Chicken Curry / Egg Curry
Rice / Roti
Dal
Salad
Healthy aur hygienic food sabse important factor है।
Step 3: Investment (Kitna Paisa Lagega?)
India (INR)
Kitchen setup: ₹30,000 – ₹1,00,000
Utensils & packaging: ₹20,000
License & registration: ₹10,000
Total: ₹60,000 – ₹1,50,000 approx.
Canada (CAD)
Setup: $3,000 – $10,000
License & inspection: $1,000+
USA (USD)
Setup: $5,000 – $15,000
Permits: $1,000 – $3,000
Australia (AUD)
Setup: $4,000 – $12,000
New Zealand (NZD)
Setup: $3,000 – $10,000
Investment location aur scale par depend karta hai।
Pricing Strategy (Tiffin Price Kitna Rakhen?)
India:
Veg Tiffin: ₹80 – ₹150 per meal
Non-Veg: ₹120 – ₹250 per meal
Canada:
Veg: $10 – $15 CAD
Non-Veg: $12 – $18 CAD
USA:
Veg: $10 – $14 USD
Non-Veg: $13 – $18 USD
Australia:
Veg: $11 – $16 AUD
Non-Veg: $14 – $20 AUD
New Zealand:
Veg: $10 – $15 NZD
Non-Veg: $13 – $18 NZD
Monthly subscription model jyada profitable होता है।
Profit Calculation Example
अगर India में:
50 customers
₹120 per tiffin
25 days per month
Income = 50 × 120 × 25 = ₹1,50,000
Expenses approx ₹80,000
Net Profit = ₹70,000 per month
Scale badhane par profit aur increase hota है।
Required Licenses & Legal Requirements
India:
FSSAI License
Local municipal registration
Canada:
Food safety certification
Health inspection approval
USA:
Food handler permit
Local business license
Australia & New Zealand:
Food safety compliance
Council approval
Legal compliance zaroori hai trust aur safety ke liye।
Veg vs Non-Veg – Kya Start Karein?
Vegetarian Tiffin:
✔ Lower cost ✔ Easy storage ✔ Large market
Non-Vegetarian:
✔ Higher price ✔ Better margins ✔ High demand among bachelors
Best strategy: Dono options rakhein।
Delivery System
Self delivery (initial stage)
Delivery boys hire करें
Uber Eats / DoorDash (in USA, Canada)
Local delivery apps
Packaging eco-friendly aur leak-proof hona चाहिए।
Marketing Strategy
WhatsApp group promotion
Facebook & Instagram page
Local ads
Referral discounts
Student hostel tie-ups
Digital marketing bahut powerful tool hai।
Is Tiffin Business Profitable? (Tiffin service business)
Flowchart – Tiffin Business Start Plan (Text Version)
Idea → Market Research → Menu Decide → Investment Plan → License Apply → Kitchen Setup → Marketing Start → First Customers → Monthly Subscription → Scale Business
Final Conclusion
Tiffin business ek low-risk aur high-demand food business model hai। India, Canada, USA, Australia, aur New Zealand sab jagah Indian homemade food ki demand growing hai। Agar aap hygienic, tasty aur affordable meals provide करते हैं, to yeh business ₹50,000 se start karke lakhon tak grow ho sakta है। Small start karein, quality maintain karein, aur monthly subscription model adopt karein – aapka tiffin business profitable ho sakta hai। Agar aap chahte hain to main iska professional flowchart image bhi create kar sakta hoon for website ya blog use.
homemade tiffin delivery profit margin tiffin service Online food delivery trends 2026 catering services demand healthy meal delivery 2026 ood delivery business home-cooked meal service Tiffin service canada Tiffin service usa Tiffin service australia Tiffin service nz Tiffin service india Tiffin service business in hindi Tiffin service business start
ALS Disease Explained Diagnosis, Treatment, and Hope for the Future
What is ALS Disease? (Amyotrophic Lateral Sclerosis)
ALS disease एक serious neurological disorder है जो brain और spinal cord की nerve cells (motor neurons) को damage करता है। ALS का पूरा नाम है Amyotrophic lateral sclerosis। इसे आम भाषा में Lou Gehrig’s Disease भी कहा जाता है। इस बीमारी में muscles धीरे-धीरे weak होने लगते हैं क्योंकि nerves muscles तक signals भेजना बंद कर देती हैं। समय के साथ patient को चलने, बोलने, खाने और सांस लेने में difficulty होने लगती है।
What is ALS? (ALS Kya Hai?)
ALS एक progressive neurodegenerative disease है। Progressive का मतलब है कि यह समय के साथ बढ़ती जाती है।
इसमें motor neurons (जो muscles को control करते हैं) damage हो जाते हैं। जब ये nerve cells मरने लगते हैं तो muscles को signals नहीं मिलते, जिससे muscle weakness और paralysis होने लगता है।
How Does ALS Start? (ALS Kaise Shuru Hota Hai?)
ALS आमतौर पर 40–70 years की age में शुरू होता है, लेकिन कभी-कभी younger people में भी हो सकता है।
Early Symptoms (Shuruaati Lakshan):
हाथ या पैर में कमजोरी
बार-बार गिरना
बोलने में अस्पष्टता (slurred speech)
मांसपेशियों में झटके (muscle twitching)
हाथ से चीजें गिर जाना
थकान और stiffness
शुरुआत में symptoms हल्के होते हैं और लोग अक्सर इन्हें ignore कर देते हैं।
Causes of ALS (ALS Hone Ke Karan)
ALS का exact cause अभी पूरी तरह clear नहीं है। लेकिन कुछ possible factors हैं:
Genetic mutation (लगभग 5–10% cases hereditary होते हैं)
Diagnosis early stage में difficult हो सकता है क्योंकि symptoms अन्य diseases जैसे Parkinson या Multiple Sclerosis से मिलते-जुलते हो सकते हैं।
ALS Treatment (ALS Disease)
Important बात: अभी तक ALS का permanent cure उपलब्ध नहीं है। लेकिन treatment से disease progression को slow किया जा सकता है और symptoms manage किए जा सकते हैं।
FDA Approved Medicines for ALS
1. Riluzole
यह दवा nerve damage को slow करने में मदद करती है। यह disease progression को कुछ महीनों तक slow कर सकती है।
2. Edaravone
यह antioxidant drug है जो nerve cells को damage से बचाने में मदद करती है।
3. AMX0035
कुछ देशों में approved है और neuron protection में मदद करता है।
Supportive Treatment (Supportive Care)
ALS patients के लिए multidisciplinary care जरूरी है:
Physical therapy
Speech therapy
Occupational therapy
Breathing support (Ventilator)
Feeding tube (advanced stage में)
Side Effects of ALS Medicines (दवाइयों के साइड इफेक्ट्स)
Riluzole Side Effects:
Nausea
Weakness
Liver function changes
Dizziness
Edaravone Side Effects:
Headache
Breathing problems
Skin reactions
Allergic reaction
किसी भी medicine को लेने से पहले doctor से consult करना जरूरी है।
Can ALS Be Recovered? (क्या ALS ठीक हो सकता है?)
वर्तमान समय (2026) में ALS का complete cure उपलब्ध नहीं है। लेकिन treatment और therapy से:
Life expectancy improve हो सकती है
Quality of life बेहतर की जा सकती है
Disease progression slow हो सकता है
कुछ patients 3–5 साल तक survive करते हैं, जबकि कुछ 10 साल या उससे अधिक भी जी सकते हैं।
Famous scientist Stephen Hawking ALS से कई दशकों तक जीवित रहे थे, जो एक rare case था।
Life Expectancy (जीवन प्रत्याशा)
Average life expectancy diagnosis के बाद 3–5 साल होती है। लेकिन modern treatment और ventilator support से survival time बढ़ सकता है।
Advanced Research in 2026
2026 में ALS पर कई clinical trials चल रहे हैं:
Gene therapy
Stem cell research
CRISPR gene editing
Neuroprotective drugs
Research का main goal disease progression रोकना और future में cure ढूंढना है।
Risk Factors (जोखिम कारक)
Age (40–70 years)
Family history
Smoking
Military service (कुछ studies में पाया गया)
Prevention (बचाव कैसे करें?)
क्योंकि exact cause clear नहीं है, इसलिए prevention difficult है। लेकिन healthy lifestyle मदद कर सकता है:
Regular exercise
Balanced diet
Smoking avoid करें
Regular health checkups
Emotional & Mental Health Support
ALS केवल physical disease नहीं है, यह emotional impact भी डालती है।
Patients और families को चाहिए:
Counseling support
Support groups
Mental health therapy
Family care involvement
Final Conclusion
ALS (Amyotrophic Lateral Sclerosis) एक serious neurodegenerative disease है जो muscles को धीरे-धीरे कमजोर करती है। हालांकि इसका permanent cure अभी उपलब्ध नहीं है, लेकिन modern medicines जैसे Riluzole और Edaravone disease progression को slow कर सकते हैं। Early diagnosis, proper medical care और supportive therapy से patient की quality of life बेहतर की जा सकती है। अगर किसी व्यक्ति को muscle weakness, speech problem या unexplained fatigue हो रही है, तो तुरंत neurologist से consult करें। Health awareness और timely treatment से life management possible है।
ALS Treatment 2026 Symptoms of ALS ALS treatment ALS symptoms Riluzole ALS Amyotrophic Lateral Sclerosis ALS diagnosis life expectancy ALS Lou Gehrig’s disease treatments ALS research full form of als in hindi what is full form of als als kya hai what is ALS Disease
Save Phone Numbers in Gmail ID, Android Drive & Apple Account in Step-by-Step
आज के digital era में phone numbers को manually diary में लिखकर रखना safe नहीं है। अगर आपका phone lost हो जाए या reset हो जाए तो सारे contacts delete हो सकते हैं। इसलिए 2026 में सबसे safe तरीका है cloud backup — यानी अपने contacts को Gmail ID, Android (Google Drive) और Apple Account (iCloud) में save करना।इस guide में हम आपको one-click method के साथ step-by-step पूरा process समझाएंगे।
Why Cloud Contact Backup is Important in 2026?
✔ Phone lost होने पर contacts safe रहते हैं ✔ New phone में automatic restore हो जाते हैं ✔ Multiple devices पर sync रहते हैं ✔ Manual export/import की जरूरत नहीं ✔ Secure encrypted cloud storage
Android users के लिए Google Contacts और Apple users के लिए iCloud सबसे best options हैं।
HOW TO SAVE PHONE NUMBERS IN GMAIL ID (GOOGLE ACCOUNT) – ONE CLICK METHOD
अगर आप Android phone use करते हैं तो आपके contacts automatically Google account में save हो सकते हैं।
Step 1: Google Account Add करें
Phone Settings खोलें
Accounts या Passwords & Accounts पर जाएँ
Add Account पर क्लिक करें
Google select करें
Gmail ID और password डालें
Step 2: Contact Sync Enable करें
Settings → Accounts → Google
अपनी Gmail ID select करें
Sync Contacts option ON करें
अब आपके सभी contacts automatically Gmail में save हो जाएंगे।
Step 3: Web पर Check करें
Browser में contacts.google.com खोलें
Gmail ID से login करें
यहाँ आपके सभी phone numbers दिखाई देंगे
यह one-click auto sync method है।
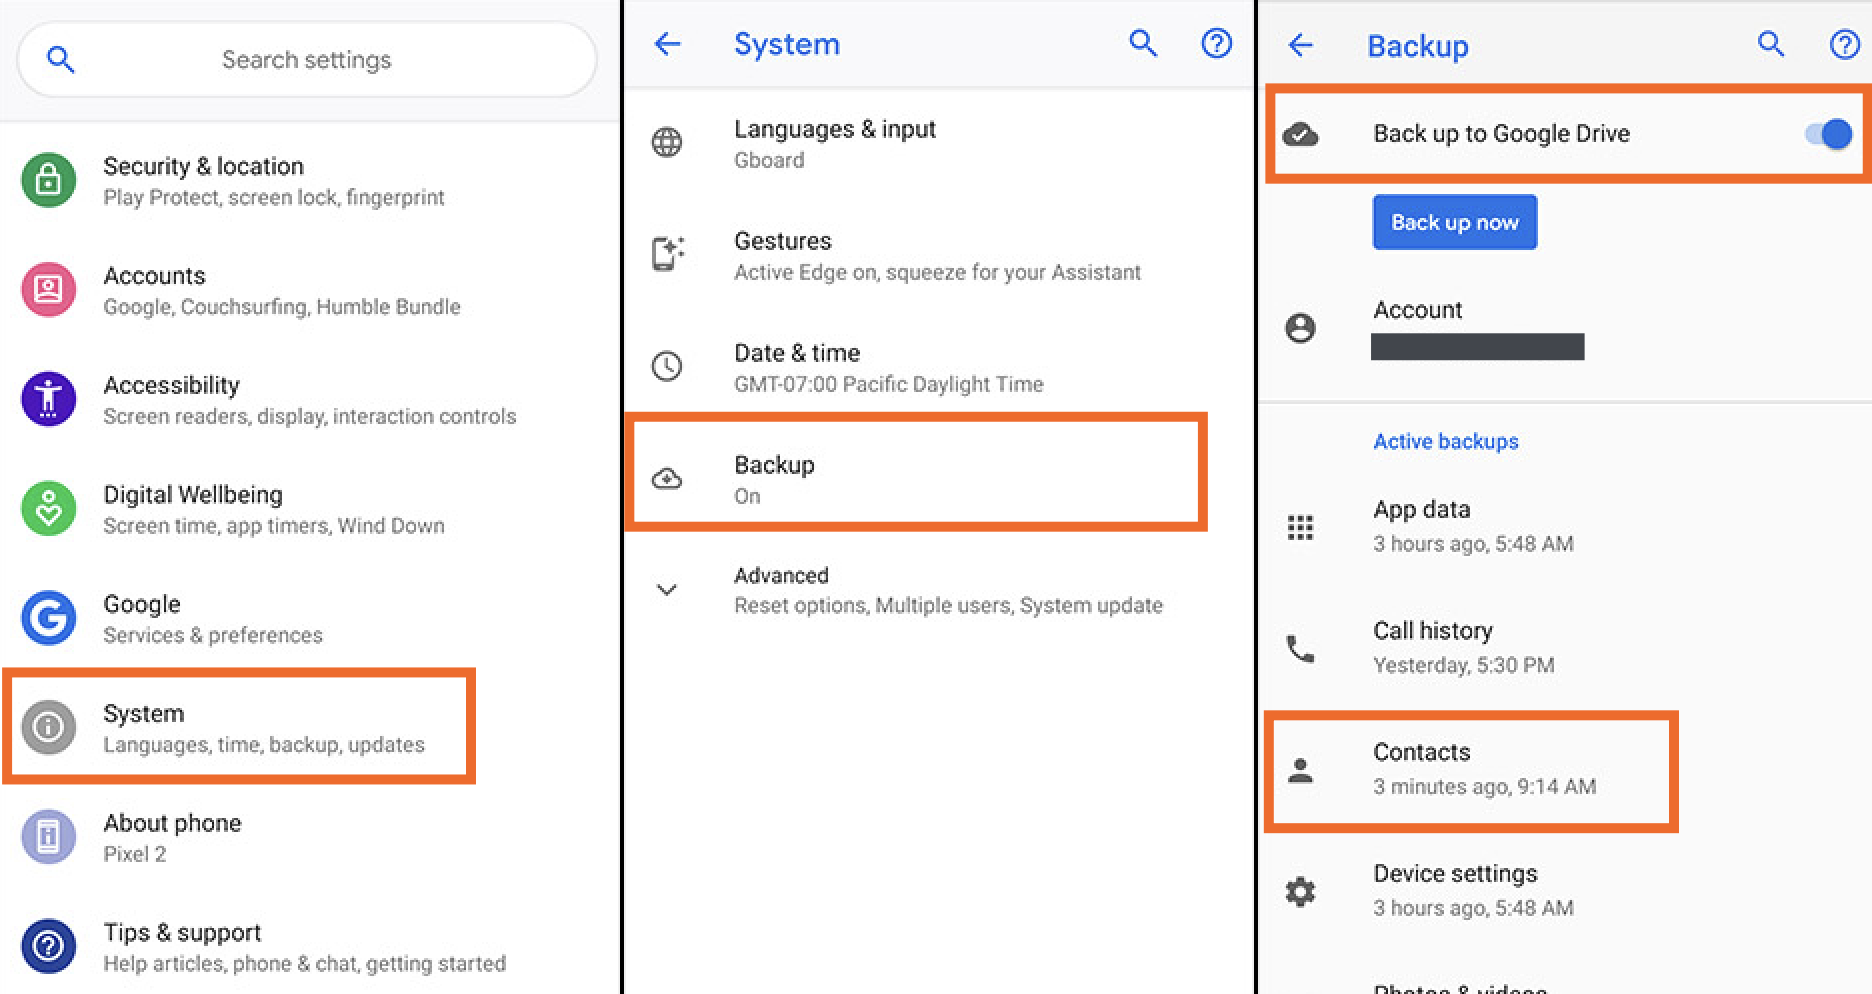
AUTOMATIC CONTACT BACKUP USING GOOGLE DRIVE (ANDROID USERS)
Android phone में contacts Google Drive में backup होते हैं।
Step 1: Google Drive Backup ON करें
Settings खोलें
Google पर जाएँ
Backup option select करें
“Backup by Google One” ON करें
यह process automatically contacts, call history, SMS और app data backup करता है।
Step 2: Backup Status Check करें
Settings → Google → Backup → Check Last Backup
अगर backup complete दिख रहा है तो आपके contacts Google cloud में safe हैं।
HOW TO SAVE PHONE NUMBERS IN APPLE ACCOUNT (ICLOUD) – ONE CLICK SYNC
अगर आप iPhone user हैं तो contacts automatically Apple account में save हो सकते हैं।
Apple के official cloud service का नाम है iCloud।
Step 1: iCloud Login करें
iPhone में Settings खोलें
ऊपर Apple ID पर क्लिक करें
iCloud select करें
Step 2: Contacts Sync ON करें
iCloud settings में Contacts toggle ON करें
Merge option आए तो Merge select करें
अब आपके सारे contacts iCloud में save हो जाएंगे।
Step 3: Web से Verify करें
Browser में icloud.com खोलें
Apple ID से login करें
Contacts पर क्लिक करें
यहाँ आपके सारे phone numbers दिखाई देंगे।
ONE CLICK METHOD TO TRANSFER CONTACTS FROM ANDROID TO IPHONE
अगर आप Android से iPhone shift कर रहे हैं तो Apple का official app Move to iOS use करें।
Process:
iPhone setup के दौरान “Move Data from Android” चुनें
Android phone में Move to iOS app install करें
Code enter करें
Contacts select करें
Transfer complete करें
ONE CLICK METHOD TO TRANSFER CONTACTS FROM IPHONE TO ANDROID
iPhone में iCloud backup ON करें
Android phone में same Gmail ID login करें
Contacts.google.com में iCloud file import करें
Alternative method: iCloud.com → Contacts → Export vCard → Google Contacts में Import करें
PROFESSIONAL TIPS FOR SAFE CONTACT STORAGE
✔ Always enable auto sync ✔ Strong password use करें ✔ Two-factor authentication enable करें ✔ Regular backup status check करें ✔ Duplicate contacts merge करें
COMMON PROBLEMS & SOLUTIONS
Problem 1: Contacts sync नहीं हो रहे
Solution:
Internet connection check करें
Sync toggle OFF/ON करें
Google account remove करके दुबारा add करें
Problem 2: Duplicate contacts
Solution: Google Contacts → Merge & Fix option use करें
Problem 3: iCloud contacts show नहीं हो रहे
Solution:
iCloud storage check करें
Logout करके दुबारा login करें
ADVANCED CLOUD SECURITY FEATURES 2026
2026 में Google और Apple दोनों advanced encryption use करते हैं।
Google account security:
Two-Step Verification
Device activity monitoring
Security alerts
Apple iCloud security:
End-to-End encryption
Advanced Data Protection
Biometric authentication
FINAL CONCLUSION – BEST METHOD FOR CONTACT SAFETY
अगर आप Android user हैं तो Gmail + Google Drive backup best option है। अगर आप iPhone user हैं तो iCloud sync सबसे secure और easy solution है। Cloud contact backup आज के समय में mandatory है। One-click sync enable करके आप lifetime के लिए अपने phone numbers safe रख सकते हैं। अब आपको manually contact save करने की जरूरत नहीं है। Just enable sync and relax. अगर आपको यह detailed guide helpful लगी हो तो इसे share करें और अपने contacts आज ही secure करें।
Contact Sync Solutions Cloud Backup Services 2026 Save Contacts in iCloud Backup Contacts to Google Drive Phone Number Safety Tips One Click Data Transfer Two-Factor Authentication Services Cloud Encryption Technologies gmail contact save apple contact save Cloud Contact Backup Save Phone Numbers in Gmail ID Save Phone Numbers in Android Drive Save Phone Numbers in Apple Account
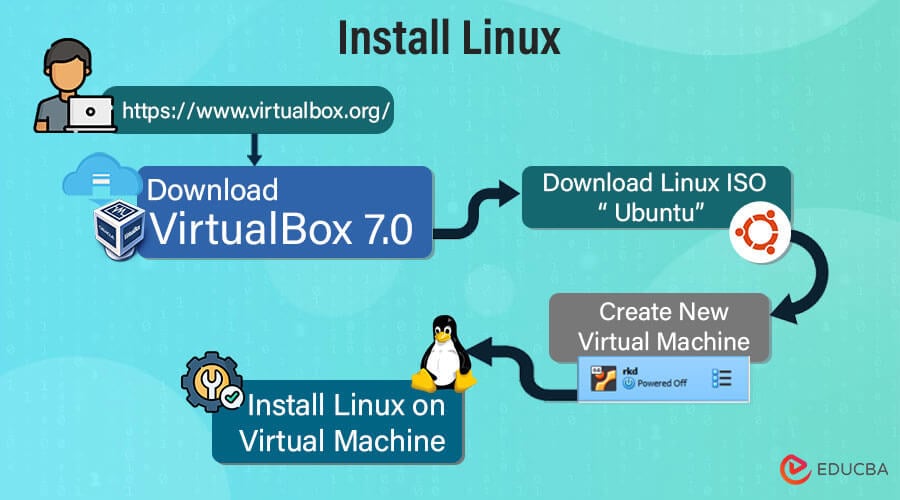
Linux आज के digital world में एक powerful और secure operating system है। विशेष रूप से Ubuntu Linux beginners और professionals दोनों के लिए best choice है। ऊपर बताए गए 2026 latest steps को follow करके आप आसानी से अपने computer या laptop में Ubuntu install कर सकते हैं। अगर आपको यह जानकारी useful लगी हो तो fastnews123.com पर ऐसी ही tech related updates पढ़ते रहें। यदि आपके मन में कोई प्रश्न हो तो comment box के माध्यम से पूछ सकते हैं।
Linux installation Ubuntu system requirements best Linux OS 2026 Ubuntu new features 2026 installing Ubuntu Linux installation guide in hindi Linux installation guide Ubuntu upgrades Linux in hindi
So, you have an idea for an online business. how to start small business online That’s the easy part. The real work is turning that spark into a real, money-making venture. The path from a concept scribbled on a napkin to your very first online sale can feel long and complicated, but it’s simpler than you think if you break it down.
At its core, starting an online business is about three things: validating an idea that people actually need, getting your legal house in order with things like GST, and then building your digital shopfront to welcome customers.
Your Roadmap From Idea to First Online Sale
Jumping into the world of e-commerce in India has never been easier, but that doesn’t mean it isn’t overwhelming. This guide is your map. We’ll cut through the noise and give you a straight, actionable plan to take you from a flicker of an idea to a validated product that customers are happy to pay for.
And the timing couldn’t be better. The opportunity for new online businesses in India is absolutely massive. In FY 2021, Indians splurged over $30 billion on online shopping. That number is set to explode, projected to cross $100 billion by FY 2026. This boom, largely fuelled by customers in tier-2 and tier-3 cities, signals a golden age for entrepreneurs. You can dig into more of these e-commerce trends on Inc42.com.
The secret to getting ahead is getting started. A solid plan transforms a huge, scary goal into a series of small, manageable steps. Forget about climbing the whole mountain at once; just focus on taking that first step.
Your Launch Timeline at a Glance
To make your online business a reality, it’s helpful to see the journey in clear, distinct phases. This stops you from feeling swamped and keeps you focused on what’s important right now. Think of it as a three-act play: first, the idea and planning; second, building the structure; and finally, the grand launch.
This timeline breaks down the entire launch into three core stages, from brainstorming all the way to growth.
As the infographic shows, launching is not a single event. It’s a sequence of deliberate actions, beginning with your core idea and culminating in a living, growing business.
To give you a clearer picture, here’s a high-level look at how you can structure your first 90 days.
Your First 90-Day Online Business Launch Plan
This table lays out the key milestones to hit as you bring your business to life.
Phase
Key Actions
Estimated Timeline
Conceptualise & Validate
Market research, niche selection, competitor analysis, business plan draft, idea validation through surveys or a small test group.
Days 1-30
Build & Organise
Business registration (sole proprietorship, etc.), GST & Udyam registration, domain name purchase, e-commerce platform selection, payment gateway setup.
This plan isn’t set in stone, but it gives you a powerful framework to follow. Let’s break down what each of these phases really means for you.
H3: Breaking Down the Journey
Phase 1: Conceptualise & Validate (First 30 Days) This first month is all about brainpower and strategy. You’ll be digging deep into your chosen niche, sizing up the competition, and, most importantly, making sure there’s a real demand for your idea before you sink your time and money into it. It’s about asking the right questions, not pretending you have all the answers.
Phase 2: Build & Organise (Next 30-45 Days) Once your idea is proven, it’s time to build. This is where you get all the official stuff done. You’ll register your business, handle legal necessities like GST or Udyam registration, and choose your e-commerce platform—whether that’s your own website with WooCommerce or selling on a marketplace. This is when your business starts to feel real, both legally and online.
Phase 3: Launch & Grow (Final 15-30 Days) This is the final, exciting sprint. Your attention shifts to the customer-facing details: creating beautiful product listings, crafting a marketing plan to bring in your first visitors, and locking down your shipping and delivery process. The aim here is to launch with a bang and have a clear strategy for getting those crucial first sales.
Finding and Validating Your Business Idea
Every great online business starts with an idea, but let’s be honest—not every idea builds a great business. The real secret is validation. It’s the process of proving that actual, real-life people are willing to pay for what you want to sell. This is where you step back from your own excitement and start gathering cold, hard facts to see if your concept can actually stand on its own.
A brilliant idea that nobody wants is just a hobby. So, before you start dreaming about logos or registering your business, your first job is to become a detective. The best part? You can do most of this without spending a single rupee, using tools you probably already use every day.
Uncover Demand with Digital Tools
Your validation journey begins by listening to what the market is already saying. Free tools can offer incredible clues about what people are searching for, talking about, and, most importantly, complaining about. Think of it as your first reconnaissance mission.
A great place to start is Google Trends. It’s a surprisingly powerful tool for something so simple. Let’s say you want to sell “sustainable packaging for small businesses.” You can pop that into Google Trends and see if people in India are searching for it more or less over time. You can even compare it to another idea, like “eco-friendly gift wrapping,” to see which term has more public interest.
Next, it’s time to become a social media spy. Don’t just scroll—analyse. Search for your main keywords on platforms like Instagram and Facebook. Who are the big names in that space? What kind of content are they sharing? But the real gold is in the comments section. What are their customers saying?
Pay close attention to the complaints. If you see people constantly asking, “Do you offer this in a different colour?” or “Why is the shipping so slow?”, you’ve just stumbled upon a potential gap in the market. That gap could be your business opportunity.
Find Your Niche by Solving Real Problems
Once you’ve got a general feel for the market, it’s time to zero in on the specific problems you can solve. This is where online communities become your secret weapon for market research.
Reddit: Subreddits like r/india, r/IndianSkincareAddicts, or even city-specific groups are absolute goldmines. People here are incredibly open about their frustrations and what they wish they could find and buy.
Facebook Groups: Look for groups related to your niche, something like “Home Bakers in Mumbai” or the “Indian Dropshipping Community.” Join the conversations, listen to the challenges members are facing, and spot the needs that aren’t being met.
Quora: Search for questions about your potential product or service. If you see dozens of people asking, “What is the best affordable protein powder in India?”, that’s a huge signal of strong demand for information—and very likely, a product.
Don’t just be a silent observer. Engage with the community. Answer questions and offer helpful advice without trying to sell anything. This not only builds trust but also gives you direct insight into how your future customers think and talk. You’ll learn the exact words they use to describe their problems, which is priceless information for your marketing down the line.
Test the Waters with a Minimum Viable Product
Thinking and researching are great, but the ultimate test of validation is getting someone to actually pull out their wallet. This is where the concept of a Minimum Viable Product (MVP) comes into play. An MVP isn’t your perfect, final product. It’s the most basic version you can create to see if people will actually buy it.
Depending on your business, your MVP can take many forms:
Business Type
Example MVP
How It Validates Demand
Service-Based
Offer your service (e.g., social media management) to a handful of clients at a big discount.
This proves people will pay for your expertise and helps you iron out your process.
Physical Product
Set up a simple landing page with good mockups of your product and a "Pre-Order Now" button.
You can gauge real purchase intent before you risk money on a huge inventory.
Digital Product
Sell a small, low-cost piece of your main product, like one chapter of your e-book or a single template from a pack.
This tests whether the core idea is compelling enough to make someone pay.
You can get your first eyes on your MVP with a small, focused ad budget—even ₹2,000-₹5,000 on Instagram or Facebook can work wonders. Target the exact audience you discovered during your research phase. If those pre-orders start coming in or your discounted service slots get booked up, congratulations. You've officially moved beyond just an idea. You now have a data-backed concept with proven market demand, giving you the green light to confidently move forward and start your small business online.
Sorting Out the Legal and Financial Side in India
Alright, you've got a validated business idea. Now comes the part that often feels a bit daunting: setting up the legal and financial foundation. Honestly, getting your legal house in order right from the start is one of the smartest moves you can make. It protects you personally, builds trust with customers, and paves the way for smooth sailing as you grow.
Let’s be real—figuring out how to start a small business online is more than just having a cool product. It needs a proper legal framework behind it. This is your no-nonsense guide to Indian business compliance, breaking down what you actually need to do without drowning you in jargon.
Choosing Your Business Structure
The first big decision is how to register your business. This choice affects everything from your personal liability and taxes to your ability to get funding down the road. For most people starting a new online venture in India, there are three main paths to consider.
Sole Proprietorship: This is the simplest and most common way to go if you're a one-person show. You and your business are legally the same entity. That means no complex registration, but it also means you're personally on the hook for any business debts. It's a perfect fit for freelancers, consultants, or small-scale sellers just testing the waters.
Limited Liability Partnership (LLP): Think of an LLP as the middle ground. It gives you the operational flexibility of a partnership but with the limited liability of a company, so your personal assets are safe from business debts. You'll need at least one other person to be a partner, making it a great option if you're starting out with a co-founder.
Private Limited Company (Pvt. Ltd.): This is the most formal structure, creating a completely separate legal entity. It offers the strongest protection for your personal assets and makes it much easier to attract investors. While it comes with more paperwork and compliance, it’s the go-to structure for startups with big growth ambitions.
For a new entrepreneur just starting out, a sole proprietorship is often the easiest and fastest way to begin. You can always convert to an LLP or a Pvt. Ltd. later as your business grows and your needs change.
Making Sense of GST and Udyam Registration
Two registrations you'll hear a lot about are GST and Udyam. Don't let the acronyms intimidate you; they're quite straightforward and come with some serious perks.
Goods and Services Tax (GST) is a definite must-have for certain online businesses. If you plan to sell physical goods on marketplaces like Amazon or Flipkart, you need to register for GST from day one, no matter how much you earn. However, if you're a service provider or only selling products through your own website, the rules are different. You generally only need to register after your annual turnover crosses ₹20 lakhs for services or ₹40 lakhs for goods.
Udyam Registration is a free government registration that officially tags your business as a Micro, Small, and Medium Enterprise (MSME). The online process is quick—about 10 minutes—and the benefits are massive. India's startup scene is buzzing right now, thanks to record IPOs and better access to funding. As part of this push, government schemes like Startup India offer tax holidays for businesses with under ₹25Cr turnover, and MSME loans are available at great interest rates. Getting your free Udyam registration is a critical first step to unlocking these advantages.
Getting Your Finances in Order
Keeping your personal and business money separate is an absolute must. The first thing you should do is open a dedicated business bank account. It's easy to do once you have your business registration papers, even for a proprietorship. This simple step makes accounting, filing taxes, and tracking your profits a whole lot clearer. Many entrepreneurs also look for initial funding, and you might be interested in learning about options like the Mudra Loan Yojana and how to apply online.
Finally, you need a way to actually get paid online. That's where payment gateways come in. They securely handle payments from your customers via credit cards, debit cards, UPI, and net banking.
Offers competitive pricing and has strong support for handling international payments.
Businesses planning to sell to customers both in India and overseas.
Picking the right gateway ensures your customers have a smooth checkout experience, which directly boosts your sales. With your legal structure, registrations, bank account, and payment system all set up, you're officially ready to build your online store and start welcoming your first customers.
Building Your Online Store and Digital Presence
With a solid idea and your legal papers sorted, it’s time for the exciting part: building your digital headquarters. This is where your brand finally comes to life and where customers will actually meet you. For every new entrepreneur, the first big question is always where to set up shop online.
You essentially have two main roads you can take. You can either jump into the massive, churning river of an established marketplace or you can carefully build your own branded island. Each path has serious pros and cons, and the right answer for you boils down to your business model, how much you can spend, and what you want your business to look like in a few years.
Marketplace vs. Your Own Website: Which Is Right for You?
This isn't just a technical decision; it’s a strategic one that will shape your brand, customer relationships, and how much money you actually keep. Marketplaces like Amazon and Flipkart give you an instant audience, but building your own website gives you something priceless: total control.
Let's dig into the real differences to help you figure out where to plant your flag.
Feature
Selling on a Marketplace (e.g., Amazon)
Building Your Own Website (e.g., Shopify)
Audience Access
Instant access to millions of active, ready-to-buy shoppers.
You have to build your audience from scratch through marketing.
Trust Factor
High. Customers already trust the marketplace's brand.
You are responsible for earning every bit of customer trust.
Brand Control
Very limited. You're just another seller on their turf.
Total control over your brand's look, feel, and customer journey.
Customer Data
The marketplace owns all customer data and relationships.
You own your customer data, perfect for direct marketing and retargeting.
Fees & Costs
High commissions, listing fees, and ad costs eat into profits.
Predictable monthly platform fees, but you keep all your sales revenue.
Competition
Extremely high. Your product is listed right next to rivals.
You control the entire selling environment. No direct competitors.
While marketplaces feel like a shortcut to sales, the hidden costs and lack of brand ownership can hold you back. For anyone serious about building a lasting brand, launching your own online store is almost always the better long-term play. It’s how you build a real connection with your customers.
Setting Up Your Starter Store with Shopify
If you’ve decided to build your own brand, platforms like Shopify or WordPress with the WooCommerce plugin are your best friends. They give you all the power you need without demanding you become a coding expert. Let’s walk through the basics of getting a Shopify store off the ground.
The whole process is designed to be simple, so your main job is to create a storefront that feels clean, professional, and trustworthy.
Pick a Clean Theme: Your theme is your store’s outfit. Shopify has fantastic free themes like “Dawn” or “Sense” that are modern and look great on mobile. Don’t go for anything cluttered; simplicity screams professionalism.
Write Compelling Product Descriptions: Don’t just list specs. Tell a story. How does your product make someone’s life better? Use clear, benefit-driven language. Use bullet points so people can scan the key info quickly.
Integrate Indian Payment Gateways: This is a breeze. Shopify works perfectly with top Indian gateways like Razorpay and PayU. You can set them up in your Shopify dashboard to start accepting UPI, credit/debit cards, and net banking from day one.
Insider Tip: Amazing product photos are non-negotiable, but you don’t need a professional photographer. Your smartphone, some good natural light (try shooting near a window), and a simple white background (a large sheet of chart paper works wonders) are all you need for crisp, credible images that sell.
Once your store is up, the foundation it’s built on matters. Shopify handles all the technical hosting for you, which is a huge relief. But if you go the self-hosted route with something like WordPress, choosing the right host is critical. It’s well worth your time to understand why you should avoid the pitfalls of free web hosting and invest in a quality provider from the get-go.
Your online store is more than a digital catalogue; it’s the heart of your business. By picking the right platform and focusing on a clean, customer-first experience, you’re laying the groundwork for a business that can truly grow.
Your Go-To-Market Strategy for Finding First Customers
Congratulations, your online store is live! That’s a huge milestone. But let’s be real—a beautiful store with no visitors is just a digital ghost town. Now the real work begins: bringing in traffic and finding your first customers. This is your digital marketing starter kit, focused on high-impact strategies you can pull off even on a tight budget.
The goal isn’t to be everywhere at once. It’s about being strategic and putting your energy where it’ll actually count. Forget expensive ad agencies for now; let’s concentrate on foundational tactics that build momentum and lock in those first precious sales.
Master the Basics of Search Engine Optimisation
When someone in India needs something, their first instinct is to Google it. If your online store doesn’t show up in those search results, you’re essentially invisible. This is where Search Engine Optimisation (SEO) comes in, and it’s your most powerful tool for getting free, consistent traffic over time.
Think of SEO as making your website speak Google’s language. The better you do this, the higher you’ll rank when potential customers search for products just like yours.
Here’s where to start:
Use the Right Keywords: What words would your ideal customer type into Google? Use free tools like Google Keyword Planner to find these phrases (e.g., “handmade leather wallet India” or “organic baby clothes online”).
Optimise Your Pages: Place these keywords naturally on your product pages, in your headlines, and in your product descriptions. Each page should target a specific keyword to signal its relevance to Google.
Write Helpful Blog Content: Starting a blog is a game-changer for SEO. Writing articles that answer your customers’ questions (like “how to care for a leather wallet”) not only establishes you as an expert but also helps you rank for more search terms. For more tips on this, explore our comprehensive guide on what content marketing is and how it works.
Build a Community on Social Media
While SEO is a long game, social media is where you can start building relationships today. Don’t spread yourself thin trying to be on every platform. Instead, pick one or two where your target audience hangs out—for many consumer brands in India, that means Instagram and Facebook.
Your goal on social media isn’t just to spam product photos; it’s to build a genuine community.
“People don’t buy what you do; they buy why you do it.” This famous quote from Simon Sinek is the heart of social media marketing. Share your story, show behind-the-scenes content, and interact with your followers to build a brand people feel connected to.
Get active in Facebook groups related to your niche or run polls on Instagram Stories. The more you interact, the more the platform’s algorithm will show your content to new people.
Run Your First Targeted Ad Campaign
Once you have some momentum, a small, strategic ad budget can pour fuel on the fire. You don’t need a massive investment; a targeted campaign for under ₹5,000 can deliver big results if done right.
Instagram and Facebook ads are powerful because they let you target users based on their interests, demographics, and online behaviour. For example, if you sell yoga mats, you can show your ads directly to people who follow yoga-related accounts and live in your target cities. This precision is what makes it so effective.
Marketing is also getting smarter. By next year, AI-driven marketing automation will be standard for larger companies. As a small business, you can get ahead by automating parts of the customer journey, which can slash acquisition costs by up to 30%. A practical starting point is putting 20% of an initial ₹50K budget towards Instagram Reels. Working with micro-influencers (10K-50K followers) can deliver a 5X ROI for small businesses like yours.
Turn One-Time Buyers Into Repeat Customers
Getting a new customer is great, but getting an existing customer to buy again is cheaper and far more profitable. This is where email marketing comes in. It’s your direct line of communication, away from the noise of social media algorithms.
Start collecting email addresses from day one. Offer a small discount (like 10% off the first order) in exchange for their email. Then, nurture that relationship by sending valuable content, exclusive offers, and early access to new products. This simple strategy is key to turning one-time buyers into loyal fans and securing your first 100 sales.
Frequently Asked Questions
Jumping into the world of online business always kicks up a lot of questions. We’ve pulled together some of the most common ones new entrepreneurs ask, with straight-to-the-point answers for anyone starting out in India.
How Much Money Do I Need to Start an Online Business in India?
The honest answer? It really depends. But we can definitely pin down some realistic numbers. The great thing about starting an online business today is that for many ideas, the cost to get started is incredibly low. Your initial investment is tied directly to the kind of business you decide to run.
For instance, if you’re offering a service (like content writing or social media management) or trying out dropshipping, you can get going with a surprisingly small budget. You could realistically launch with as little as ₹10,000 to ₹25,000. This would cover the basics:
Domain Name: Around ₹800 – ₹1,500 for a year.
E-commerce Platform: A basic Shopify plan starts at about ₹1,900 a month.
Initial Ad Budget: A test budget of ₹5,000 to ₹10,000 to go find those first customers.
But if you’re planning to launch your own direct-to-consumer (D2C) brand where you manage your own stock, the initial investment is naturally going to be higher. You’ll need to budget for manufacturing or buying your first batch of products.
Sample Budget for a Small D2C Brand: A startup selling its own physical products might set aside ₹75,000 to ₹1,50,000 for its first three months. This would typically cover legal setup, platform fees, an initial inventory run, packaging, and a solid marketing budget to get those initial sales rolling in.
Do I Need to Register for GST Immediately?
The rules around Goods and Services Tax (GST) can seem tricky, but they’re pretty straightforward once you know where your business fits. Whether you need to register depends on two things: what you sell and where you sell it.
If you plan to sell physical goods on a marketplace like Amazon, Flipkart, or Myntra, the answer is simple: you must have a GST registration from day one. There’s no turnover threshold here; it’s a mandatory rule for selling products on these platforms.
The rules are a bit more relaxed, however, if you are selling services or if you’re selling goods only through your own website. In these cases, you only need to register once you hit a certain turnover:
For services, you need to register for GST once your annual turnover crosses ₹20 lakhs.
For goods sold from your own site, the threshold is even higher at ₹40 lakhs in annual turnover.
Getting this right from the start is key. It helps you stay compliant without getting buried in paperwork before you really need to.
What Is the Easiest Online Business to Start?
The “easiest” online business is always going to be the one that clicks with your skills, your passions, and the cash you have on hand. What’s simple for one person might be a headache for another. That said, a few models are consistently great starting points for beginners looking for a low-risk way in.
Dropshipping is a top choice for anyone with limited funds. You sell products that are shipped straight from the supplier to your customer. Since you don’t buy any inventory upfront, the financial risk is almost zero. It’s a fantastic way to learn the e-commerce game.
If you have a specific skill, offering services online is another easy path to take. This could be anything from graphic design and virtual assistance to digital marketing or content writing. Your expertise is your main asset, and startup costs are tiny—often just a simple website and some networking.
Finally, selling digital products is a brilliant low-overhead model. Think about creating and selling things like:
E-books or guides on topics you know inside and out.
Digital templates for social media, resumes, or presentations.
Short online courses or workshops.
Once you create a digital product, you can sell it over and over again with no extra inventory cost. The profit potential is excellent. The best choice for you will balance low startup costs with what you’re genuinely interested in, setting you up for a more enjoyable and sustainable journey.
Stay informed with the latest business insights, practical guides, and market trends at FastNews123. We provide the actionable knowledge you need to turn your entrepreneurial ideas into reality. Explore more at https://fastnews123.com.
online business startup how to start small business online start online business ecommerce platforms in India business registration process GST registration for startups digital marketing tips small business legal requirements online marketing strategies business growth strategies
Complete Steps to Launch Your Clothing Brand Today
How to Start a Clothing Business – Complete Step-by-Step Launch Your Clothing Brand Today
Starting a clothing business is one of the most profitable and scalable ventures in the fashion industry. However, success requires structured planning, financial discipline, brand positioning, and operational control. Below is a professional, end-to-end blueprint covering every stage — from idea validation to scaling a profitable apparel brand.
Stage 1: Market Research & Niche Selection (Foundation Stage)
Before investing capital, conduct deep market research.
Key Questions:
Who is your target audience? (Men, women, kids, luxury, streetwear, ethnic, activewear)
What price range will you target? (Budget, mid-range, premium)
Who are your competitors?
What gap exists in the market?
High-Value Niches (2026 Trends):
Sustainable fashion
Custom print-on-demand apparel
Athleisure & fitness wear
Modest fashion
Streetwear brands
Kids designer clothing
Professional Tip: Choose a niche with growing demand and manageable competition. Avoid launching a “general clothing store” without a unique selling proposition (USP).
Professional brands scale systematically, not aggressively.
Profit Potential in Clothing Business
Gross Margin:
40% – 70% average
High-Profit Niches:
Streetwear
Athleisure
Luxury women’s wear
Sustainable fashion
Risk Factors (Clothing Brand Today)
Overstocking inventory
Poor quality control
Weak branding
Ineffective marketing
Seasonal demand fluctuation
Proper planning reduces these risks significantly.
Complete Startup Timeline
Month 1: Market Research & Planning
Month 2: Supplier Finalization & Sample Development
Month 3: Production & Website Setup
Month 4: Launch & Marketing Campaign
Month 6+: Optimize & Scale
Final Professional Advice
The clothing industry is competitive but highly profitable if executed strategically. Focus on:
Strong brand positioning
Premium product quality
Data-driven marketing
Customer loyalty
Scalable operations
A well-managed clothing brand can evolve from a small startup into a global fashion label within 3–5 years if backed by consistent branding, operational excellence, and aggressive digital marketing.
Clothing Brand Today how to start a clothing business sustainable fashion print-on-demand clothing athleisure wear private label clothing clothing brand strategy dropshipping clothing business luxury fashion startup best clothing ecommerce platforms trademark for clothing brand
Prime Minister Dhan Dhaanya Krishi Yojana: Complete Guide, Benefits & Step-by-Step Application Process
India की economy की backbone हमेशा से agriculture रही है। किसानों की income बढ़ाना, खेती को sustainable बनाना और rural economy को मजबूत करना हर सरकार की प्राथमिकता रही है। इन्हीं उद्देश्यों को ध्यान में रखते हुए सरकार ने Prime Minister Dhan Dhaanya Krishi Yojana की शुरुआत की है। यह योजना किसानों को financial support, modern farming tools और income security देने के लिए बनाई गई है।
Prime Minister Dhan Dhaanya Krishi Yojana क्या है?
Prime Minister Dhan Dhaanya Krishi Yojana एक farmer-centric government scheme है, जिसका मुख्य उद्देश्य किसानों की खेती से होने वाली आय (farm income) को बढ़ाना और उन्हें आर्थिक रूप से आत्मनिर्भर बनाना है। इस योजना के अंतर्गत सरकार किसानों को direct financial assistance, crop productivity support, और risk protection प्रदान करती है।
“Dhan” का अर्थ है financial stability और “Dhaanya” का अर्थ है food security। यानी यह योजना किसान और देश—दोनों की prosperity को ध्यान में रखकर बनाई गई है।
इस योजना की जरूरत क्यों पड़ी?
भारत में आज भी बड़ी संख्या में किसान छोटे और marginal हैं। Climate change, rising input costs, और market uncertainty किसानों की income को प्रभावित करते हैं। Prime Minister Dhan-Dhaanya Krishi Yojana का उद्देश्य इन challenges को address करना है:
Farmers की monthly income stable बनाना
Modern farming techniques को promote करना
Crop failure और price fluctuation से protection देना
Rural economy को strengthen करना
Prime Minister Dhan Dhaanya Krishi Yojana के मुख्य लाभ (Key Benefits)
इस योजना के तहत किसानों को कई direct और indirect benefits मिलते हैं:
Direct Financial Support Eligible किसानों को yearly या seasonal financial assistance दी जाती है, जिससे seed, fertilizer और basic farming costs cover हो सकें।
Income Stability यह योजना किसानों की income को predictable और stable बनाने में मदद करती है।
Support for Small & Marginal Farmers Small landholding वाले किसानों को priority दी जाती है।
Crop Productivity Boost Better seeds, soil health guidance और modern practices को encourage किया जाता है।
Risk Management Natural disasters या crop loss की स्थिति में financial stress कम होता है।
कौन किसान इस योजना के लिए Eligible हैं?
Prime Minister Dhan Dhaanya Krishi Yojana का benefit पाने के लिए कुछ basic eligibility conditions होती हैं:
Applicant भारत का citizen होना चाहिए
Farmer के नाम पर agricultural land registered हो
Small और marginal farmers को preference
Government records में farmer details updated होनी चाहिए
कुछ राज्यों में tenant farmers या sharecroppers को भी local guidelines के अनुसार शामिल किया जा सकता है।
Prime Minister Dhan Dhaanya Krishi Yojana में कितना पैसा मिलता है?
Scheme structure के अनुसार किसानों को fixed financial assistance दी जाती है, जो yearly installments में या crop season के हिसाब से मिल सकती है। यह amount सीधे किसान के bank account में DBT (Direct Benefit Transfer) के माध्यम से transfer की जाती है।
इसका उद्देश्य middlemen को हटाकर benefit को सीधे farmer तक पहुंचाना है।
Prime Minister Dhan Dhaanya Krishi Yojana के लिए Online Apply कैसे करें?
Step-by-Step Application Process
Step 1: Official Portal Visit करें सबसे पहले सरकार द्वारा notified official agriculture portal पर जाएं।
Step 2: Farmer Registration करें “Farmer Registration” या “Apply for Scheme” option पर क्लिक करें।
Step 3: Personal Details भरें
Name
Aadhaar Number
Mobile Number
Address
Step 4: Land Details Upload करें
Khata/Patta number
Land size
Crop details
Step 5: Bank Account Information दें
Account number
IFSC code
Aadhaar-linked bank account होना जरूरी है
Step 6: Documents Upload करें
Aadhaar card
Land ownership proof
Bank passbook copy
Step 7: Final Submit करें Details verify करने के बाद application submit करें और acknowledgment slip save करें।
के माध्यम से अपना application status online check कर सकते हैं।
Prime Minister Dhan Dhaanya Krishi Yojana Good or Bad?
Why it is Good:
Direct income support
Transparent DBT system
Small farmers focused
Farming risk को कम करता है
Possible Limitations:
Awareness की कमी
Document mismatch से delay
State-wise implementation difference
Overall, यह योजना किसानों के लिए positive और long-term beneficial मानी जाती है।
Farmers के लिए Expert Advice
Land records और Aadhaar details updated रखें
Bank account active और Aadhaar-linked हो
Fake websites से बचें
Official announcements पर ही भरोसा करें
Conclusion
Prime Minister Dhan Dhaanya Krishi Yojana भारत के किसानों के लिए एक strong financial support system है। यह योजना न सिर्फ income stability देती है, बल्कि modern agriculture को भी promote करती है। अगर सही तरीके से implement की जाए, तो यह scheme rural India की तस्वीर बदल सकती है।
farmers schemes India financial assistance for farmers agriculture support schemes PMDDKY online application rural economy support financial planning for farmers government schemes for farmers
MMSY Health Scheme Punjab health insurance MMSY online application free health insurance Punjab Mukhya Mantri Sehat Yojna health coverage scheme India mmsy kya hai mmsys 2026 mmsy ki hai
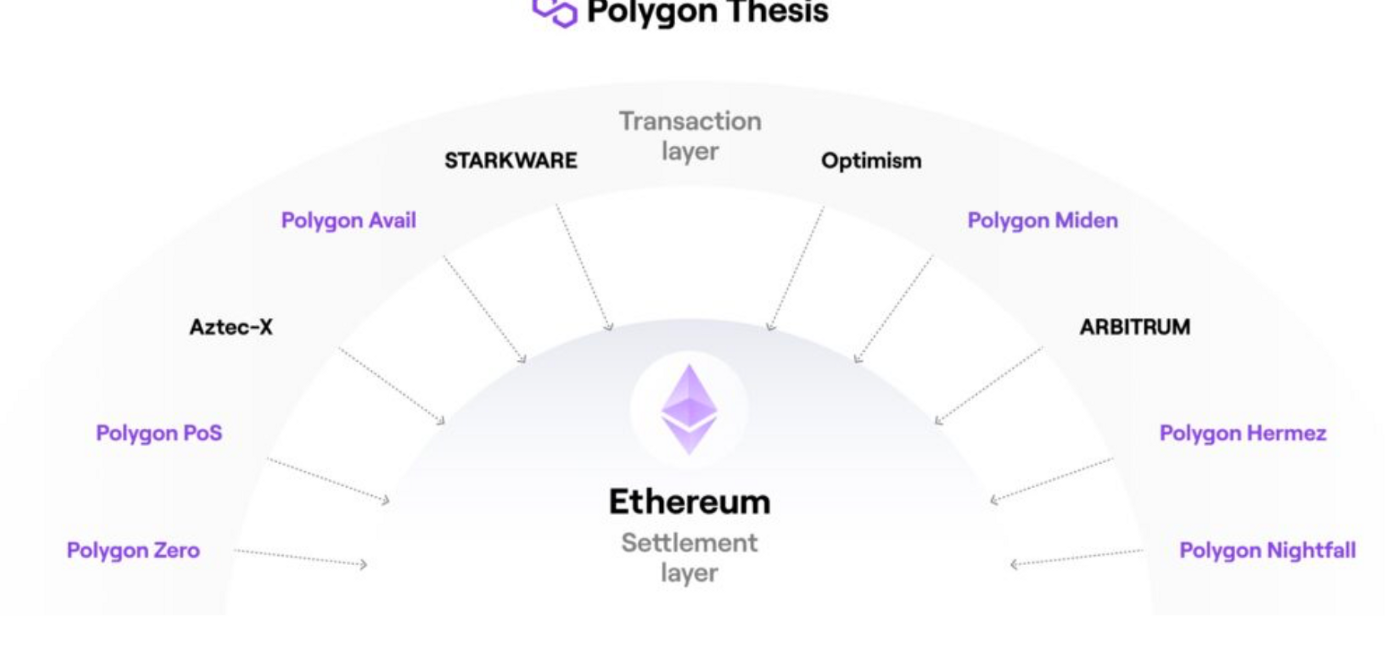
Why Polygon Cryptocurrency is the Game Changer in Ethereum Scaling Solutions
Unlocking Polygon Cryptocurrency The Future of Blockchain Investment Opportunities
Blockchain technology has moved far beyond speculation and trading. Today it represents a complete digital economy that supports payments, applications, gaming, finance, and decentralized services. Among the most established infrastructure projects in this space is Polygon — a scaling network designed to make Ethereum faster, cheaper, and more practical for mass adoption.
For investors, developers, and professionals, Polygon is not only a cryptocurrency opportunity but also a business ecosystem. It offers multiple ways to participate: investing in the token, building applications, working for the company, or launching startups on its network.
This article explains what Polygon is, how the business works, how to invest safely, how to join professionally, and how to evaluate its financial worth and long-term potential.
What Is Polygon?
Polygon is a Layer-2 blockchain scaling solution built to support Ethereum. In simple terms, Ethereum is secure but often slow and expensive due to high transaction fees. Polygon improves performance by processing transactions off the main chain and settling them more efficiently.
As a result, users get:
Lower gas fees Faster transactions Better scalability Compatibility with Ethereum apps
Thousands of decentralized applications (DeFi platforms, NFT marketplaces, gaming apps, and financial services) already operate on Polygon.
The ecosystem is supported and developed by Polygon Labs, the core technology company behind the network.
How the Polygon Business Model Works
Polygon is not a traditional company selling products. Instead, it operates as a blockchain infrastructure platform.
The business generates value through:
Transaction fees paid by users Token economics (MATIC, now migrating to POL) Partnerships with enterprises and brands Developer grants and ecosystem investments Staking rewards for validators
Developers pay small fees to use the network. Investors hold tokens that appreciate as adoption grows. Enterprises use Polygon for Web3 services. This creates a sustainable digital economy.
Unlike many speculative crypto projects, Polygon has real business utility and enterprise partnerships, which strengthens its credibility.
How to Invest in Polygon (Step-by-Step)
Investing in Polygon is similar to investing in other major cryptocurrencies.
First, open an account on a trusted crypto exchange such as Binance, Coinbase, or Kraken.
Complete identity verification (KYC process).
Deposit funds using bank transfer, UPI, or debit/credit card.
Search for the Polygon token (MATIC or POL).
Buy the token and transfer it to a secure wallet such as MetaMask or a hardware wallet.
Hold for long-term growth or stake tokens to earn rewards.
Staking can generate passive income of 5–10% annually depending on network conditions.
For disciplined investors, monthly savings plans work well. For example:
₹10,000 per month investment or $200–$300 per month
Over time, systematic investing reduces volatility risk.
How to Join Polygon Professionally
Polygon offers several career and business entry points.
Blockchain engineering Product management Marketing Business development Legal and compliance Community management
Recruitment usually involves:
Online application Technical or HR interview Skill test Final interview
Salaries are competitive with global tech companies. Blockchain engineers often earn premium compensation.
2. Developer / Startup Route
Entrepreneurs can build startups directly on Polygon.
Steps:
Learn Solidity or blockchain development Create a Web3 app or service Deploy on Polygon network Apply for ecosystem grants or venture funding
Polygon regularly funds early-stage startups building DeFi, NFT, or gaming projects.
This path can create high-value businesses without heavy infrastructure costs.
3. Validator or Staker
Investors can also participate as validators.
Buy tokens Stake them on the network Help secure transactions Earn staking rewards
This is similar to earning interest but with blockchain participation.
Monthly Savings and Earning Opportunities (Polygon Cryptocurrency)
Polygon offers multiple earning methods:
Long-term token holding Staking rewards Freelance blockchain development Full-time jobs Launching decentralized apps Consulting services
Professionals in blockchain often earn significantly more than traditional IT roles. Developers with Web3 skills are in high demand globally.
A conservative monthly saving plan could look like:
Income: ₹60,000–₹1,20,000 Investment: ₹10,000–₹20,000 monthly in Polygon Staking returns + price growth over time
This creates both active income and passive returns.
Polygon Net Worth and Financial Strength
Polygon has raised significant venture capital funding from global investors. The ecosystem has processed billions of transactions and supports thousands of applications.
Its valuation has reached multi-billion-dollar levels during funding rounds, making it one of the strongest blockchain infrastructure companies outside of Ethereum itself.
Because it is a token-based decentralized network, it does not plan a traditional IPO like stock market companies. Instead, the token acts as the economic representation of the network’s value.
In crypto projects, token appreciation often replaces the IPO model.
Is Polygon a Good Investment or Business Opportunity?
Polygon stands out for several reasons:
Strong technology Real-world use cases Low transaction fees Growing adoption Enterprise partnerships Active developer community
However, risks exist:
Crypto price volatility Regulatory changes Competition from other blockchains Market cycles
For long-term investors who understand blockchain technology, Polygon is considered one of the more stable and credible infrastructure investments.
It is not a “get rich quick” asset, but rather a long-term growth play similar to early internet platforms.
Final Thoughts
Polygon represents more than just a cryptocurrency. It is an expanding digital economy offering investment, employment, and entrepreneurial opportunities.
Few industries today combine technology, finance, and innovation at this scale. For individuals willing to learn the fundamentals and take a disciplined approach, Polygon offers both professional growth and financial upside in the evolving Web3 landscape.
Blockchain technology DeFi on Polygon Polygon NFT marketplace Invest in Polygon Invest in blockchain Economic impact of blockchain fastnews123 business


 ਕੀ ਹੈ?")